
MagicMenus
Questions answered by this recipe
- Can I edit my site-menus or group-menus by building and editing wiki-pages?
- Can I enhance my skin's responsive design using wiki-pages for navigation when the screen is too small for a regular menu?
- Can I modify any existing skin to add special responsive menus?
- Can I easily have custom menu's for different groups?
- Can I have have both horizontal menus (top-bar) and floating inset menus (side-bar) with different content based on Group?
- Can I splice menus so a group uses a regular menu with additional local content?**
Description
Use Wiki-Pages to template and edit multiple menus for Dynamic/Responsive Pages
This code can be inserted into any existing skin to add special menus
or to replace existing menus with Magic Menus!
This recipe requires CSS files to establish function and to provide the decorative style to match your skin
The Magic Menus recipe ( uses one main file:
- parseMenu.phpΔ (Works without Editing)
But to make getting started easier I have included the CSS code I use for my menus:
- navbar_function.cssΔ (Working code from the Snippets Pub Wiki, edit to match your skin.)
- navbar_style.css.phpΔ (more CSS, but using PHP for Variables to allow easy color changes.)
You will also need to edit your skin template.
See Install instructions.
For Example: This Markup

As a Wiki-Page makes this:
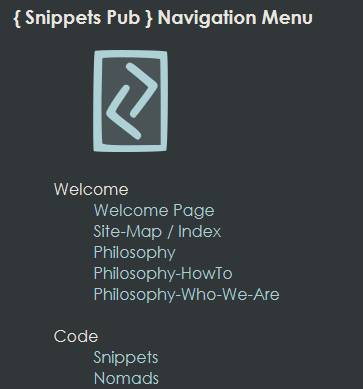
And then becomes this Menu:
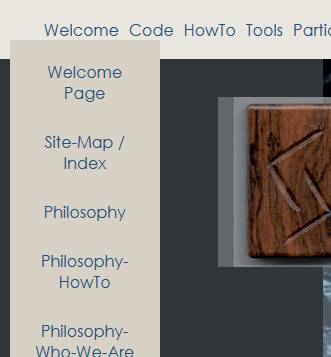
Notice the title and logo image do not appear in the menu!
Installation
First:
Like most recipes you need the code. I am providing three files:
The parseMenu.phpΔ which is the Markup itself.
Then I have two CSS files that provide the function and decoration I am using currently on one of my Wiki pages: https://www.snippetspub.com which uses this recipe
(In fact, the recipe was invented for the site.)
navbar_function.cssΔ this is the css that makes the Menus work
navbar_style.css.phpΔ (This is a php file used for CSS to make variables easier.)
I am intending to release the Art-House Skin soon which will let you fully run the top-bar and side-bar menus and even see the splash menus all in use.
You will need to copy the parseMenu.php file into your /pmwiki/cookbook/ directory
Edit your /local/config.php file to add the following line: include_once( "$FarmD/cookbook/parseMenu.php" );
in the <head> section with other CSS references add:
    <link rel="stylesheet" type='text/css' href="$SkinDirUrl/navbar_function.css" />
    <link rel="stylesheet" type='text/css' href="$SkinDirUrl/navbar_style.css.php" />
Of course this assumes you will copy the two files (navbar_functions.css & navbar_style.css.php) into your current Skin directory.
For example the pmwiki default would be /pub/skins/pmwiki/
Now, you will Need to Edit your Skin Template to inject the Menu or Menus
You only need one line of code to inject the Menu content of a Wiki-Page:
<!--markup:(:parseMenu $Group.NavBar $SiteGroup.NavBar :)-->
As part of the skin.tmpl file, this calls the Markup on page-build.
- First (in this code) the Markup looks for a page in the current $Group, here called NavBar, e.g Main/NavBar
- If it cannot find that page, it uses the default $Site.NavBar e.g. Site/NavBar
To Allow CSS to decorate different styles of Menu, you may want to put the Markup inside a nav element with a set ID or Class
- ->e.g. <nav id='topNavBar' class="NavBar">
To take it a step further you might put that in a named div which can be shown or hidden using CSS responsive size rules.
I have one menu for a larger screen and a smaller menu for a smaller screen so I get something like this:
    <!--PageHeaderFmt-->

    <div id="Header">
      <div id="Monogram">
        <a href="$WikiHome">$WikiMonogram</a>
      </div>
      <div id="MiniNav">
        <nav id='miniNavBar' class="NavBar">
            <!--markup:(:parseMenu $Group.MiniNav $SiteGroup.MiniNav :)-->
        </nav>
      </div>
      <div id="StickyNav">
        <nav id='topNavBar' class="NavBar">
            <!--markup:(:parseMenu $Group.NavBar $SiteGroup.NavBar :)-->
        </nav>
      </div>

      ... etc.
Now this won't show anything until you create those wiki pages - $Group/NavBar and/or Site/NavBar
To insert a Menu using your wiki-page (Here called "Site/NavBar" you Start with the Markup (:Menu:)
and end the Menu with (:MenuEnd:)
In between we use normal Unordered List Markup to create Menu and Sub-Menu items
* This is a Top Menu
** This is a Sub-Menu
(The space after the '*' is important!)
The included CSS Hides each Sub-Menu until its Top Menu is selected
Notice we can have a Menu-Item which is not a link - use that to make titles
* PmWiki Categories
** [[Main/Welcome]]
** [[Main/Getting-Started]]
** Special Groups:
** [[News/News]]
** [[Blog/Blog]]
That's enough to make it work, but here are some additional features:
Horizontal Rules:
Two options in Markup** ----
is the same as** (:hr:)
Likewise you might just want an empty space at the end of a menu or in between menu items:
(:Spacer:) will give you just that!
To insert an Image to display on the Magic-Menu-Page or in a regular Menu (Not the Horizontal Menus)
(:Splash:) Tells the Markup to show the following image instead of a Menu
e.g.:(:Splash https://www.snippetspub.com/wiki/media/DecoMotion.jpg"Snippets Pub - Home. Image: Art Deco - Zeppelin, Buildings and Train":)
For example in a side-bar menu this can fill otherwise empty space, if a Group does not need a local menu.
One More Trick!
In responsive Designs I like to have the Main Menu allow a Local or Group Menu to be Spliced onto it!
So we have a simple (:Splice:) Markup.
While it is simple to add that to the end of any Magic Menu Wiki-Page. Using it is a little more tricky:
If you call that page normally there is nothing different.
But if you pass the sub-menu page as a $GET reference it will be spliced in where the (:Splice:) Markup is.
To do this you add ?GroupNav= followed by the page-name (No spaces)
For example, if I call a NavBar page with a link that looks like this:* [[Site/NavBar?GroupNav={$Group}/GroupNav | Nav Menu ]]
The link just looks like a link to "Nav Menu" but the Site/NavBar page will be built including the $Group/GroupNav menu, spliced in where the (:Splice:) markup is!
Configuration
Internationalization
The following strings can be translated in an XLPage:
Usage
Notes
To do / some day / maybe
Change log / Release notes
Added code to ignore all page text before (:Menu:) and after (:MenuEnd:) markup
This allows more flexibility in decorating your navigation page for better "Responsive" design.
See also
Contributors
Comments
See discussion at MagicMenus-Talk
User notes : If you use, used or reviewed this recipe, you can add your name. These statistics appear in the Cookbook listings and will help newcomers browsing through the wiki.